Enable third-party AI agent access to your MCP server
Explore Logto's AI solutions: authentication and authorization for MCP servers, AI agents, and apps.
This guide walks you through integrating Logto with your MCP server using mcp-auth and the MCP official SDK v2, allowing third-party AI agents to authenticate users with their consent and securely access your MCP server.
You'll learn how to:
- Configure Logto as the authorization server for your MCP server.
- Onboard third-party AI agents, either by registering third-party apps or by enabling dynamic app so any agent can connect without pre-registration.
- Set up a “whoami” tool in your MCP server to return the current user's identity claims.
- Test the flow with a third-party AI agent (MCP client).
After this tutorial, your MCP server will:
- Authenticate users in your Logto tenant, with user consent for third-party AI agents.
- Verify JWT access tokens issued by Logto (signature, issuer, audience, and expiration).
- Return the verified identity claims (
sub,iss,aud, etc.) for the "whoami" tool invocation.
The complete, runnable sample code for this guide can be found in the mcp-auth/js repository:
whoami-express: the "whoami" server in this guide, on Node.js with Express.whoami: the same server built fetch-native (web-standardRequest/Responsewith Hono), deployable to Cloudflare Workers.
Difference between third-party AI agent (MCP client) and your own MCP client
Let's take a look at an example. Imagine you’re a developer running an MCP server to manage email access and automation.
Official email app (Your own MCP client)
- You provide an official email app for users to read and manage their emails.
- How it works: The official email app connects to your MCP server using Logto to authenticate users. When Alice signs in, she automatically gets access to her emails, no extra permission screens needed, since it’s your trusted app.
Third-party AI agent (Third-party MCP client)
- You’re building an ecosystem around your MCP server, so another developer creates “SmartMail AI” (an AI assistant that can summarize emails and schedule meetings automatically) integrating it as a third-party client.
- How it works: SmartMail AI (third-party MCP client) wants to access user emails via your MCP server. When Alice signs in to SmartMail AI using her account:
- She’s shown a consent screen, asking permission for SmartMail AI to read her emails and calendar.
- Alice can allow or deny this access.
- Only the data she consents to is shared with SmartMail AI, and SmartMail AI cannot access any additional data without explicit re-consent.
This access (permission) control ensures user data safety, even though your MCP server manages all the data, third-party apps like SmartMail AI can only access what the user has explicitly allowed. They cannot bypass this process, as it's enforced by your access control implementation in the MCP server.
Summary
| Client type | Example | Consent required? | Who controls it? |
|---|---|---|---|
| Official email app | Your own email application | No | You (the developer) |
| Third-party AI agent | SmartMail AI assistant | Yes | Another developer |
If you want to integrate your MCP server with your own AI agent or app, please refer to the Enable auth for your MCP-powered apps with Logto guide.
Prerequisites
- A Logto Cloud (or self-hosted) tenant
- Node.js >= 20 environment
Understanding the architecture
- MCP server: The server that exposes tools and resources to MCP clients. Following the latest MCP specification, it acts as an OAuth 2.0 resource server that validates access tokens issued by Logto.
- MCP client: A client used to initiate the authentication flow and test the integration. The third-party AI agent will be used as the client in this guide.
- Logto: Serves as the OpenID Connect provider (authorization server), manages user identities, and issues audience-bound JWT access tokens for your MCP server.
A non-normative sequence diagram illustrates the overall flow of the process:
Due to MCP is quickly evolving, the above diagram may not be fully up to date. Please refer to the mcp-auth documentation for the latest information.
Configure third-party AI agent in Logto
To enable the third-party AI agent to access your MCP server, you need to set up a third-party app in Logto. This app will be used to represent the AI agent and obtain the necessary credentials for authentication and authorization.
A third-party app is an application created by external developers (not the resource owner) that needs user consent to access protected resources. Unlike first-party apps (your own applications), third-party apps will show a consent screen asking users to approve specific permissions before accessing their data. This ensures users have control over what data they share with external services.
To learn more, see Third-party applications.
There are three ways to onboard AI agents:
- Manually create the app in Console, for testing or a few known agents.
- Build a registration service on the Management API, if you want to control who gets credentials.
- Enable dynamic app, if any agent may connect and you don't want a registration step.
Allow developers to create third-party apps in Logto
If you are building a marketplace or want to allow developers to create third-party apps in Logto, you can leverage Logto Management API to create third-party apps programmatically. This allows developers to register their applications and obtain the necessary credentials for authentication.
You'll need to host your own service to handle the client registration process. This service will interact with the Logto Management API to create third-party apps on behalf of developers.
Alternatively, you can manually create third-party apps in Logto Console to get familiar with the process.
Let any AI agent connect without pre-registration
In an open MCP ecosystem, you usually don't know the agents in advance. Dynamic app removes the registration step: the agent uses a public HTTPS URL serving its own client metadata document as its client_id, and Logto resolves it when the authorization request arrives.
You still control what agents can request through the permissions granted to the dynamic app, and every authorization goes through the user consent screen.
Manually create a third-party app in Logto
You can manually create a third-party app in Logto Console for testing purposes or ad-hoc integrations. This is useful when you want to quickly test the integration without implementing a full client-registration flow.
-
Sign in to your Logto Console.
-
Go Applications → Create application → Third-party app -> OIDC.
-
Fill in the app name and other required fields, then click Create application.
-
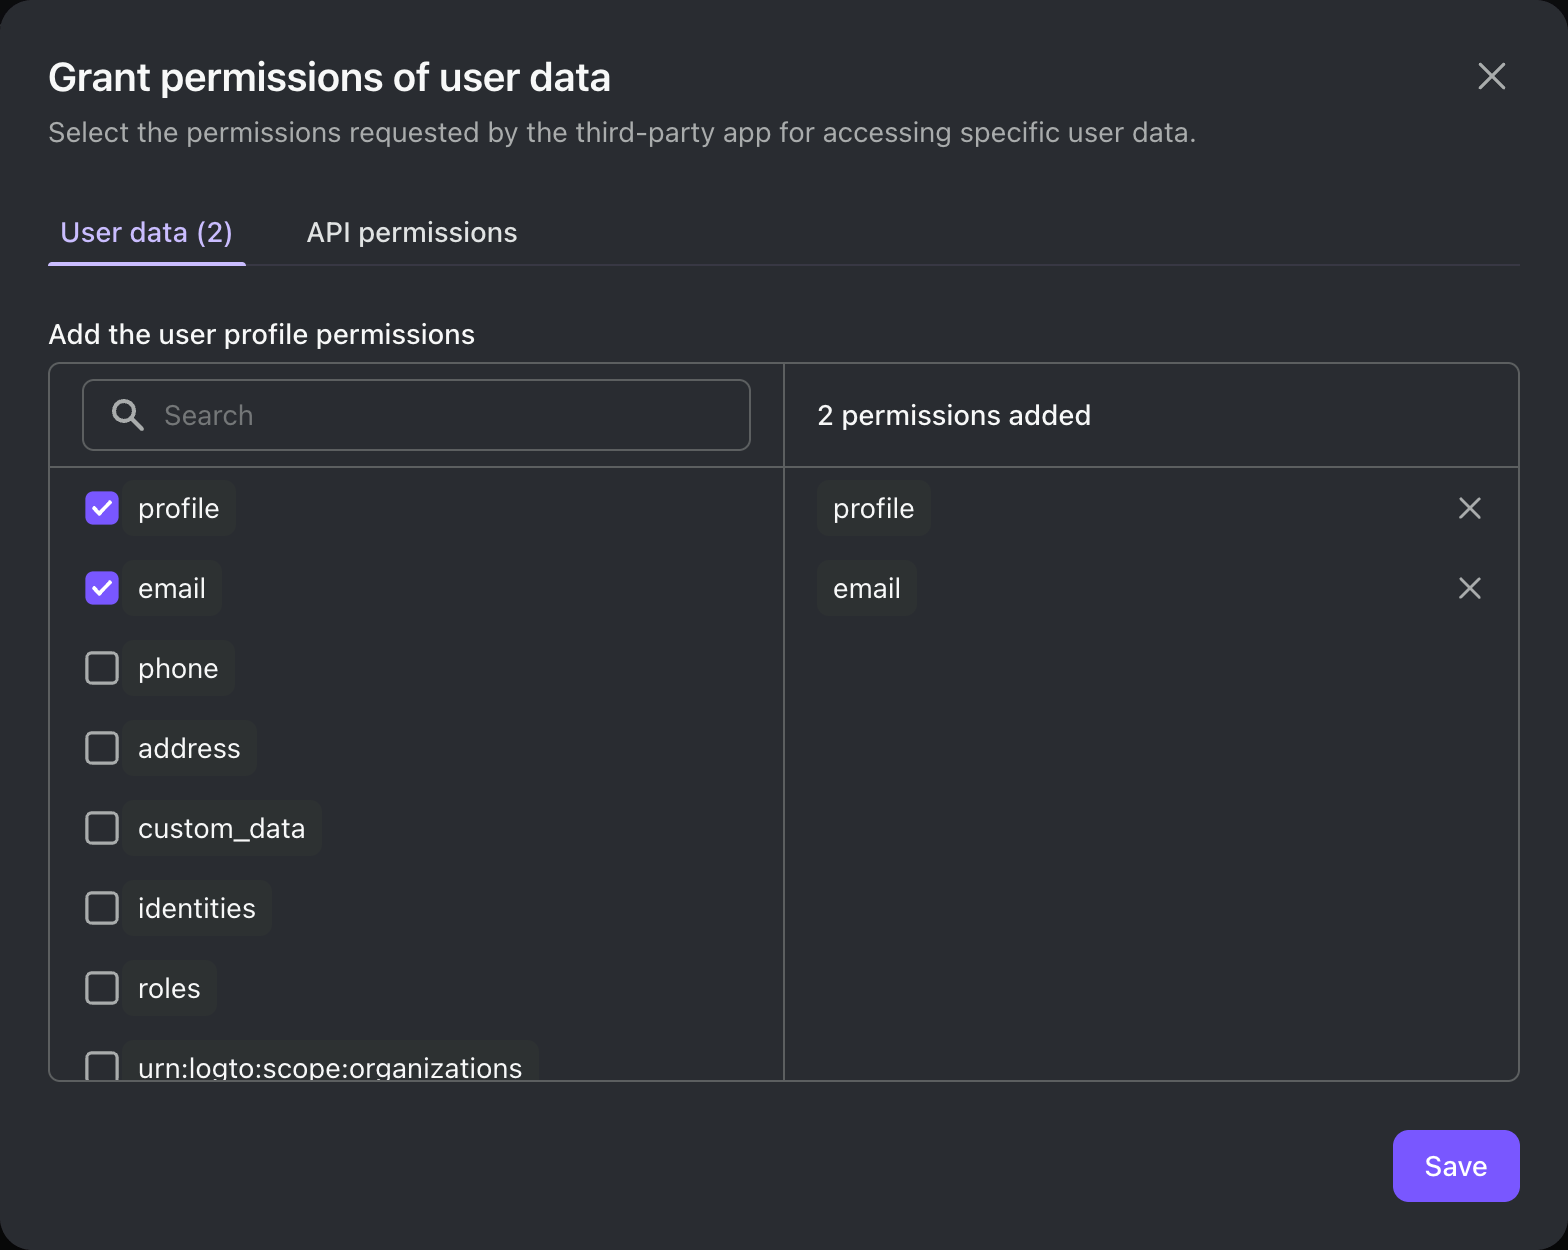
Click the Permissions tab to grant permissions to the app:
- User section: user data permissions such as
profileandemail, for basic identity claims. - API resource section: permissions (scopes) of the API resources you've defined in Logto, e.g., the API resource that represents your MCP server.
- Organization section: organization permissions, if you use Logto organizations.
- User section: user data permissions such as
-
In the third-party app, configure scopes to request the permissions you granted, e.g.,
openid profile emailplus the API resource scopes.Note:
openidis required for OIDC. To receive an access token bound to an API resource, the app must also include theresourceparameter in the authorization request. MCP clients that follow the latest MCP specification do this automatically based on the protected resource metadata. -
Configure the redirect URI of your third-party application accordingly. Remember to update the redirect URI in Logto as well.
Under the hood, a third-party app is a standard OAuth 2.0 / OIDC client. This means you (or the third-party developer) can use any OAuth 2.0 / OIDC library or framework to integrate with Logto.
A few things to keep in mind:
- When creating a third-party app, select the appropriate application type based on the app's architecture:
- Traditional web: Uses client secret for authentication.
- Single page app / Native: Uses PKCE for secure authorization without a client secret.
- Most of our quick start guides are written for first-party apps, but you can still use them as a reference for third-party app integration.
- The main difference is that third-party apps will show a consent screen, asking users for explicit permission to access their data.
See Third-party applications for full integration guide.
Set up the MCP server
We will use the MCP official SDK v2 and mcp-auth to create an MCP server with a "whoami" tool that returns the current user's identity claims.
Create project and install dependencies
mkdir mcp-server
cd mcp-server
npm init -y
npm pkg set type="module"
npm pkg set main="whoami.js"
npm pkg set scripts.start="node whoami.js"
npm install @modelcontextprotocol/server @modelcontextprotocol/express @modelcontextprotocol/node express mcp-auth
@modelcontextprotocol/serveris the core MCP SDK v2, which speaks web-standardRequest/Response.@modelcontextprotocol/expressand@modelcontextprotocol/nodeadapt it to Express on Node.js.mcp-authsupplies the token verifier and the OAuth discovery metadata for the MCP SDK.
The MCP SDK v2 and mcp-auth are ESM only and require Node.js >= 20.
Register the MCP server as an API resource
The latest MCP specification requires access tokens to be bound to the resource they are issued for (RFC 8707), and mcp-auth enforces it: the token's aud claim must match your MCP server's resource identifier. In Logto, this is done by creating an API resource whose indicator matches your MCP server's URL:
- Sign in to your Logto Console.
- Go to API resources → Create API resource.
- Fill in the details, then click Create API resource:
- API name: Enter a name, e.g., "Who am I".
- API identifier: Enter
http://localhost:3001/. It must match the resource identifier we'll configure in the MCP server.
Always include a trailing slash (/) in the resource indicator. Due to a current bug in the MCP official SDK, clients using the SDK will automatically append a trailing slash to resource identifiers when initiating auth requests. If your resource indicator doesn't include the trailing slash, resource validation will fail for those clients.
Configure MCP Auth with Logto
Declare your MCP server as a protected resource: its resource identifier and the authorization server it trusts. Remember to replace <your-logto-issuer-endpoint> with the issuer endpoint you copied earlier (found in the application details page under Endpoints & Credentials, e.g., https://my-project.logto.app/oidc).
In whoami.js:
import { MCPAuth } from 'mcp-auth';

const authIssuer = '<your-logto-issuer-endpoint>';

const mcpAuth = new MCPAuth({
  protectedResourceMetadata: {
    // The resource identifier; must match the API resource indicator registered in Logto
    resource: 'http://localhost:3001/',
    // The authorization server trusted by this MCP server
    authorizationServer: { issuer: authIssuer, type: 'oidc' },
  },
});
The authorization server metadata is fetched lazily when first needed and cached afterwards. The MCPAuth instance verifies JWT access tokens against Logto's JWKS — signature, issuer, audience, and expiration are all enforced. No hand-written token verification is needed.
Implement the "whoami" tool
Now, let's implement the "whoami" tool that returns the current user's identity claims from the verified access token. Use getAuthInfo to read the auth info that mcp-auth has verified from the tool's callback context.
import { McpServer } from '@modelcontextprotocol/server';
import { getAuthInfo } from 'mcp-auth';

// Factory function to create an MCP server instance
// Each request gets its own server instance, keeping requests isolated
const createMcpServer = () => {
  const mcpServer = new McpServer({
    name: 'WhoAmI',
    version: '0.0.0',
  });

  // Add a tool to the server that returns the current user's information
  mcpServer.registerTool(
    'whoami',
    {
      description: 'Get the current user information',
    },
    (context) => {
      const { claims } = getAuthInfo(context);
      return {
        content: [{ type: 'text', text: JSON.stringify(claims) }],
      };
    }
  );

  return mcpServer;
};
Wire up the server
Finally, serve the OAuth discovery documents (RFC 9728 / RFC 8414) so MCP clients can find your authorization server, and protect the MCP endpoint with the SDK's Bearer auth middleware.
import {
  createMcpExpressApp,
  mcpAuthMetadataRouter,
  requireBearerAuth,
} from '@modelcontextprotocol/express';
import { toNodeHandler } from '@modelcontextprotocol/node';
import { createMcpHandler } from '@modelcontextprotocol/server';

const PORT = 3001;

// The MCP handler speaks web-standard Request / Response; `toNodeHandler` adapts it to Express
const mcpNodeHandler = toNodeHandler(createMcpHandler(createMcpServer));

const app = createMcpExpressApp();

// Serve the OAuth discovery documents (`/.well-known/...`), public by design
app.use(mcpAuthMetadataRouter(await mcpAuth.getAuthMetadataOptions()));

app.all(
  '/',
  // Require a valid Bearer token; the verified auth info flows to the handler via `req.auth`
  requireBearerAuth(mcpAuth.getBearerAuthOptions()),
  // `createMcpExpressApp` applies `express.json()`, which drains the request stream, so the
  // parsed body is passed along explicitly
  async (request, response) => mcpNodeHandler(request, response, request.body)
);

app.listen(PORT);
Run the server with:
npm start
Test the integration
- Start the MCP server.
- Connect the third-party AI agent to your MCP server and invoke the
whoamitool. - The agent receives a 401 Unauthorized response, discovers Logto through the MCP server's protected resource metadata, and redirects the user to Logto for authentication.
- The user signs in and reviews the consent screen, which lists the permissions the agent requests, then approves (or denies) the access.
- The agent receives an audience-bound JWT access token and uses it to invoke the tool again.
- The MCP server verifies the access token against Logto's JWKS and returns the verified identity claims to the agent.
Further reading
Your MCP server now verifies inbound access tokens from third-party AI agents. As a next step, learn how it can securely call your downstream business APIs on behalf of users, without token passthrough or losing user context:
How an MCP server calls your API on behalf of users: a production token strategy